Battery switch on travel trailer function is crucial for managing your RV’s power. Understanding how these switches work – whether single-pole, double-pole, or dual battery – is key to avoiding electrical issues and maximizing your camping experience. This guide breaks down the different types, installation, operation, troubleshooting, and safety precautions, equipping you with the knowledge to confidently handle your travel trailer’s electrical system.
We’ll cover everything from locating your existing switch to installing a new one, including detailed wiring diagrams and troubleshooting tips. Learn how to prevent common problems like corrosion and blown fuses, ensuring your battery system remains reliable and safe. We’ll also delve into the integration of the battery switch within the broader electrical system, explaining its protective role and different wiring configurations.
Battery Switch Types in Travel Trailers
Choosing the right battery switch for your travel trailer is crucial for managing your power sources effectively and preventing potential electrical issues. Different switches offer varying levels of control and protection, so understanding their differences is key to making an informed decision.
Single-Pole Battery Switches
A single-pole battery switch is the simplest type. It’s essentially a single on/off switch controlling the connection between your battery and the trailer’s electrical system. Think of it like a light switch for your battery. Internally, it’s a simple mechanism: a lever or button that completes or breaks the circuit. When the switch is on, current flows from the battery to the trailer’s electrical components.
When off, the circuit is broken, isolating the battery from the system.
Double-Pole Battery Switches
A double-pole switch offers more control, usually managing two separate battery banks (e.g., one for house functions and one for starting the tow vehicle). Each pole controls a separate circuit, allowing you to isolate each battery bank independently. Internally, this switch has two separate switches working in unison, each controlling a distinct circuit. This allows for independent switching of the two batteries.
If one battery needs servicing, you can isolate it while still using the other.
Dual Battery Switches (with Combination Charging)
These switches go a step further, combining the functionality of a double-pole switch with integrated charging capabilities. Many incorporate a charging relay that automatically directs the charging current from your alternator or solar panel to the correct battery. Internally, these switches include additional circuitry to manage the charging process, often with diodes or transistors to ensure proper current flow.
This allows for both independent switching and automatic charging of both batteries.
Comparison of Battery Switch Types
| Switch Type | Number of Batteries | Isolation Capability | Amperage Rating | Cost |
|---|---|---|---|---|
| Single-Pole | 1 | Complete isolation of one battery | Varies (typically 50-100 amps) | Low |
| Double-Pole | 2 | Independent isolation of two batteries | Varies (typically 50-100 amps per pole) | Medium |
| Dual Battery (with Combination Charging) | 2 | Independent isolation of two batteries, automatic charging | Varies (typically 50-100 amps per pole) | High |
Advantages and Disadvantages of Battery Switch Types
Choosing the right switch depends on your needs. A single-pole switch is sufficient for trailers with only one battery, offering simplicity and low cost. However, it lacks the flexibility of isolating multiple batteries. Double-pole switches provide better control over two battery banks, crucial for separating house and starting batteries, but lack automatic charging. Dual battery switches offer the best of both worlds but come at a higher price.
The higher cost is offset by convenience and the ability to efficiently manage and charge multiple batteries.
Battery Switch Location and Installation: Battery Switch On Travel Trailer Function
Finding and installing your travel trailer’s battery switch is a straightforward process, but knowing where to look and taking safety precautions are crucial for a successful installation. This section will guide you through locating existing switches, installing new ones, and troubleshooting common issues.
Many travel trailers have their battery switches tucked away in easily overlooked spots. Knowing the typical locations significantly speeds up the search. A common location is near the battery itself, often in a dedicated compartment under the trailer. Another popular spot is inside a nearby storage compartment, possibly near the tongue or the entrance door. Less common but still possible are locations within the main control panel inside the trailer, or even near the propane tank area (though this is less ideal due to potential gas leaks).
Always check the owner’s manual if available, as the manufacturer may specify the exact location.
Locating the Battery Switch
Begin your search by visually inspecting the areas mentioned above. Look for a switch with clearly marked terminals, often labeled “+” and “-” or with a diagram showing battery connection. The switch might be a simple on/off toggle, a rotary switch, or a more sophisticated model with multiple positions. If the switch is located in a compartment, ensure you have adequate lighting and ventilation to avoid any hazards.
If you are working near the batteries, always wear safety glasses and gloves. A thorough visual inspection is often the quickest and most effective method for locating the switch.
Installing a New Battery Switch
Installing a new battery switch requires careful planning and execution to ensure proper functionality and safety. The process involves disconnecting the battery, mounting the new switch, and correctly wiring it into the existing circuit. Incorrect wiring can lead to short circuits, damage to electrical components, or even fire. Always consult a qualified electrician if you are uncomfortable with electrical work.
Imagine a flowchart:
1. Disconnect Battery: Begin by disconnecting the negative (-) battery terminal first, using a wrench. Then, disconnect the positive (+) terminal. This prevents accidental shorts during the installation process.
2.
Mount the Switch: Securely mount the new switch in a readily accessible location, preferably close to the battery but protected from the elements. Use appropriate screws and fasteners suitable for your trailer’s construction. Ensure the switch is securely fastened and won’t vibrate loose during travel.
3. Wire the Switch: This is the most crucial step.
A typical wiring diagram would show the positive (+) cable from the battery connected to one terminal of the switch, then the other terminal of the switch connected to the positive (+) side of the load (your trailer’s electrical system). The negative (-) cable from the battery connects directly to the negative (-) side of the load.
-Never* connect the negative (-) cable through the switch.
So, you’re planning a trip? Awesome! First things first: get travel insurance. Seriously, check out Aon travel insurance – it’s a lifesaver. Once you’ve sorted that out, think about your in-flight entertainment. If you’re an audiophile, preparing a killer audiophile travel setup is key for a truly enjoyable journey.
Don’t forget your noise-cancelling headphones!
Using appropriately sized wire and crimped connectors is vital for a safe and reliable connection.
4. Reconnect Battery: After the wiring is complete, reconnect the positive (+) terminal first, then the negative (-) terminal.
5. Test the Switch: Turn the switch on and off to ensure it operates correctly and all the trailer’s electrical systems function as expected.
So, you’re planning a trip? Awesome! First things first: get travel insurance. Seriously, check out Aon travel insurance – they’ve got you covered. Once that’s sorted, think about your entertainment. If you’re an audiophile, you’ll want to check out a solid audiophile travel setup to ensure your tunes sound amazing on the go.
Don’t forget your headphones!
Troubleshooting Battery Switch Installation Problems
Several problems can occur during installation. One common issue is incorrect wiring. If the trailer’s lights or appliances don’t work after installation, double-check the wiring diagram and ensure all connections are secure and correct. Another potential problem is a faulty switch. If the switch itself is malfunctioning, replace it with a new one.
Loose connections are also common; tighten all connections to ensure a strong electrical contact. If you experience any sparking or burning smell, immediately disconnect the battery and consult a qualified electrician. Persistent problems necessitate professional assistance.
Battery Switch Operation and Maintenance
Proper operation and regular maintenance of your travel trailer’s battery switch are crucial for ensuring reliable power and extending the lifespan of your batteries. Understanding how to use the switch correctly and perform routine checks will prevent potential problems and keep your RV running smoothly.
Battery Switch Operation
Knowing how to safely and effectively operate your battery switch is essential for managing your RV’s power. Incorrect use can lead to drained batteries or even damage to your electrical system. The following steps Artikel the correct procedure, regardless of whether you have a single or dual battery setup.
- Identify the switch positions: Most switches will have clearly marked positions, such as “Both,” “Battery 1,” “Battery 2,” and “Off.” Familiarize yourself with these positions before operating the switch.
- Start with the “Off” position: Always begin by turning the switch to the “Off” position to completely disconnect the batteries from the trailer’s electrical system. This is a crucial safety step before performing any maintenance or repairs.
- Select the desired position: Once you’ve turned the switch off, select the appropriate position to either use both batteries, a single battery, or isolate the batteries completely. If you’re using a single battery for a short period to avoid draining the other, choose that battery’s position. If you want to charge both batteries, choose “Both.”
- Verify functionality: After changing the switch position, check that the intended power sources are working correctly. Test lights, appliances, or other electrical components to ensure that power is flowing as expected.
Battery Switch Maintenance
Regular maintenance is key to preventing problems and ensuring the longevity of your battery switch. A simple routine inspection and cleaning can significantly extend its life and avoid unexpected failures.
- Visual inspection: At least once a month, visually inspect the switch for any signs of corrosion, loose connections, or damage to the wiring. Look for any discoloration, burning smells, or physical damage to the switch itself.
- Cleaning: Use a wire brush or a suitable cleaning agent to remove any corrosion or dirt buildup from the switch terminals and connections. A battery terminal cleaner spray is ideal for this task. Ensure that the area is completely dry after cleaning.
- Tighten connections: Check that all connections are securely tightened. Loose connections can lead to poor conductivity and overheating, potentially damaging the switch or causing a fire hazard. Use a wrench to tighten any loose nuts or bolts.
- Lubrication (if applicable): Some switches may benefit from periodic lubrication. Consult your switch’s manual for recommendations on appropriate lubricants and application methods.
Troubleshooting a Malfunctioning Battery Switch
Even with regular maintenance, problems can occur. Recognizing the signs of a malfunctioning switch is essential for prompt resolution.
- No power: If you’re unable to get power to your trailer regardless of the switch position, it could indicate a faulty switch, blown fuse, or a problem with the wiring. Check fuses first; if those are fine, the switch may need replacing.
- Intermittent power: If you experience intermittent power, this could be due to loose connections or corrosion within the switch. Clean the switch and tighten the connections. If the problem persists, the switch may need to be replaced.
- Overheating: An overheated switch is a serious issue and could indicate a short circuit or a high-resistance connection. Immediately disconnect the batteries and inspect the switch and wiring for any signs of damage. Replace the switch if necessary.
- Switch is stuck: If the switch is stuck in a particular position, try gently working it back and forth. If it remains stuck, it may require professional attention or replacement.
Troubleshooting Common Battery Switch Issues
Your travel trailer’s battery switch is a crucial component, ensuring you can power your appliances and systems. When it malfunctions, it can leave you stranded without power. Understanding common problems and how to troubleshoot them is essential for maintaining your RV’s functionality and avoiding unexpected breakdowns. This section will guide you through identifying and resolving some of the most frequent issues.
Common Battery Switch Problems
Several problems can arise with your travel trailer’s battery switch. These often stem from simple issues like corrosion or loose connections, but can also involve more serious problems like blown fuses. Addressing these issues promptly prevents further damage and ensures the continued reliable operation of your RV’s electrical system.
| Problem | Cause | Solution |
|---|---|---|
| Corrosion on terminals | Exposure to moisture and elements. | Clean terminals with a wire brush and baking soda solution. Apply dielectric grease to prevent future corrosion. |
| Loose connections | Vibration, improper installation, or age. | Tighten all connections securely. Consider using new terminals or connectors if necessary. |
| Blown fuse | Overload on the battery circuit, short circuit. | Replace the fuse with one of the same rating. Investigate the cause of the overload before simply replacing the fuse. |
Troubleshooting and Repair Procedures
Addressing battery switch problems requires a systematic approach. Here’s a breakdown of how to troubleshoot and fix the issues listed above:
- Corrosion on Terminals: 1. Disconnect the battery cables from the switch. 2. Use a wire brush to thoroughly clean the terminals, removing any corrosion. 3.
Prepare a baking soda paste (baking soda and water) and apply it to the terminals to neutralize any remaining acid. 4. Rinse with clean water and allow to dry completely. 5. Apply a thin layer of dielectric grease to the cleaned terminals to prevent future corrosion.
6. Reconnect the battery cables, ensuring a tight connection.
- Loose Connections: 1. Inspect all connections at the battery switch, paying close attention to the nuts and bolts securing the cables. 2. Tighten any loose connections using the appropriate wrench. 3.
If the connections are severely worn or damaged, replace the terminals or connectors. 4. Ensure all connections are secure and free of corrosion before reconnecting the battery.
- Blown Fuse: 1. Locate the fuse associated with the battery switch (often found in a fuse box near the switch). 2. Carefully remove the blown fuse (it will usually be visibly broken). 3.
Replace the fuse with a new one of the exact same amperage rating. Do NOT use a higher amperage fuse, as this can create a fire hazard. 4. If the fuse blows immediately after replacement, there is a short circuit in the system. You’ll need to carefully inspect the wiring for damage or contact a qualified technician.
Testing the Battery Switch with a Multimeter
A multimeter is an invaluable tool for testing the functionality of your battery switch. This step-by-step guide will show you how:
- Set the Multimeter: Set your multimeter to measure DC voltage. A typical setting would be 20V.
- Disconnect the Battery: For safety, disconnect the negative battery cable before starting the test.
- Test for Continuity (Switch ON): With the battery switch in the ON position, touch the positive multimeter lead to the positive battery cable terminal at the switch and the negative lead to the positive output terminal of the switch. You should see a reading close to the battery voltage (e.g., 12V). If the reading is zero, there’s a problem with the switch or the wiring.
- Test for Continuity (Switch OFF): Repeat the test with the switch in the OFF position. The multimeter should read close to zero volts. A voltage reading here indicates a problem with the switch.
- Reconnect the Battery: After testing, reconnect the negative battery cable.
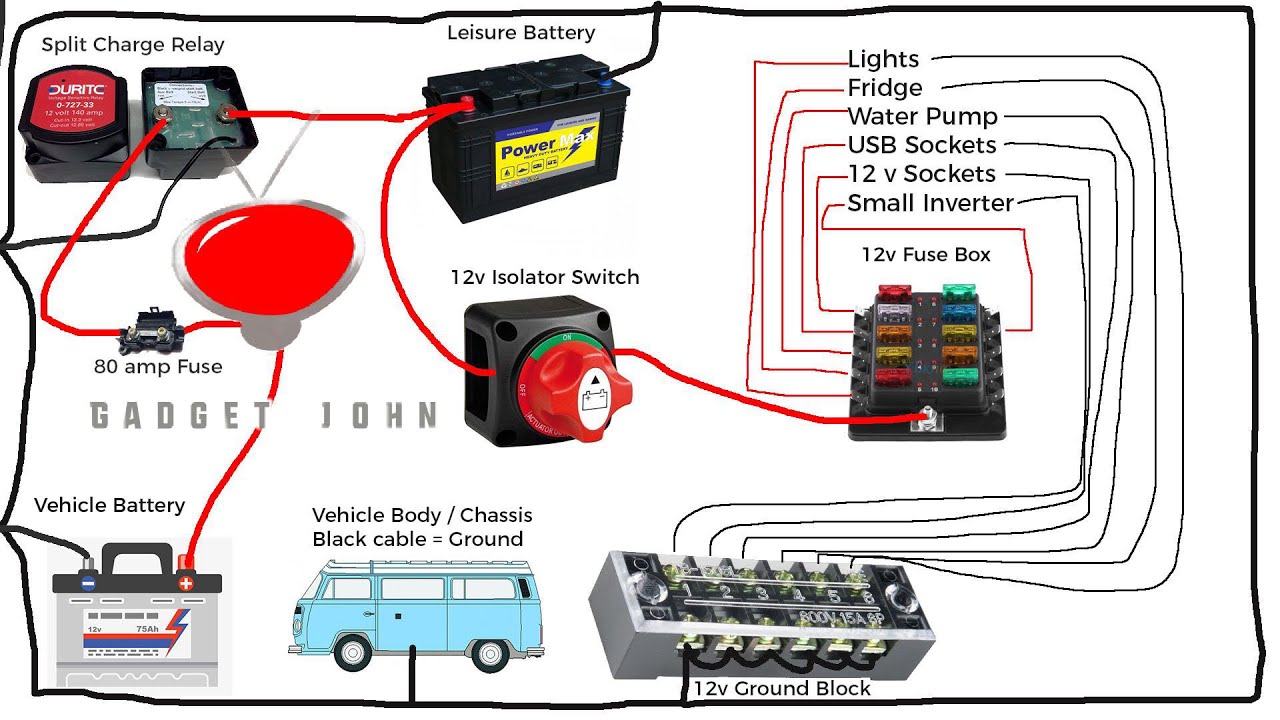
Battery Switch and Electrical System Integration

The battery switch is a crucial component in a travel trailer’s electrical system, acting as the central on/off control for your house batteries. Understanding its integration is key to safe and efficient operation of your trailer’s power. Proper installation and understanding of its function will prevent electrical issues and ensure your appliances run smoothly.The battery switch sits at the heart of the DC power distribution system.
It directly connects to the house batteries and controls the flow of power to the various DC circuits within the trailer. These circuits power lights, water pumps, and other 12-volt appliances. The switch typically has several positions: “Off,” “Battery,” and sometimes “Both” (for combining batteries) and “Start” (for connecting to the vehicle’s starting battery for boosting). When the switch is in the “Off” position, all power from the house batteries is disconnected, preventing accidental drain or short circuits.
Battery Switch Wiring Diagrams and Configurations
Several wiring configurations exist, depending on the trailer’s setup and the number of batteries. A simple system with one battery might involve a direct connection from the battery’s positive terminal, through the switch, and then to the positive bus bar distributing power to the trailer’s circuits. The negative terminal connects directly to the negative bus bar. More complex systems, using two batteries, may include a parallel configuration, where both batteries are connected to the same bus bars through the switch.
A series configuration would connect the batteries end-to-end, doubling the voltage, but this is less common in travel trailers. In all cases, appropriate fuses or circuit breakers are critical to protect the system from overloads. A diagram for a single-battery system would show the battery’s positive terminal connected to one side of the switch, the other side of the switch connected to the positive bus bar, and the negative terminal directly to the negative bus bar.
A diagram for a dual-battery parallel system would show both positive battery terminals connected to one side of the switch, the other side of the switch to the positive bus bar, and both negative terminals connected directly to the negative bus bar.
Battery Switch’s Protective Role
The battery switch acts as a primary safety device, preventing accidental short circuits and overloads within the DC electrical system. When the switch is in the “Off” position, it effectively isolates the house batteries from the rest of the trailer’s electrical system. This prevents accidental discharge of the batteries when the trailer is not in use, and significantly reduces the risk of electrical fires caused by shorts or overloads.
Fuses and circuit breakers further protect individual circuits, but the battery switch provides an overall safety mechanism to isolate the power source itself. Consider the scenario of a short circuit in a light fixture. With the switch off, the short will not cause a significant issue, as power is completely isolated from the batteries. However, with the switch on, the short circuit could potentially lead to overheating, fire, or damage to the battery itself.
Impact of Different Wiring Configurations on System Performance, Battery switch on travel trailer function
Different wiring configurations impact system performance primarily in terms of power availability and charging efficiency. A parallel configuration, for example, provides double the amperage capacity compared to a single battery system, allowing more appliances to operate simultaneously without overloading the system. However, a parallel system requires careful attention to ensuring both batteries are of the same type and capacity to avoid one battery overworking and prematurely failing.
A series configuration, while doubling the voltage, is less common in travel trailers due to the higher voltage requiring specialized wiring and appliances. A poorly wired system, regardless of configuration, can lead to voltage drops, reduced appliance performance, and potential damage to electrical components. For example, insufficient gauge wire in a high-amperage system could lead to excessive heat build-up and potential fire hazards.
Safety Considerations with Battery Switches
Working with your travel trailer’s electrical system, especially the battery switch, requires careful attention to safety. Improper handling can lead to serious injury from electric shock, burns, or even explosions from the battery itself. Understanding and following safety precautions is crucial for protecting yourself and your equipment.
Incorrect operation or maintenance of your battery switch can result in several hazards. These include accidental disconnection of essential systems (like your refrigerator or lights), sparking which could ignite flammable materials near the battery, and the risk of short circuits causing damage to your trailer’s electrical components or even a fire. A poorly maintained switch can also lead to corrosion, overheating, and eventual failure, leaving you stranded.
Safety Precautions When Working with Battery Switches
Before you begin any work on your battery switch or the trailer’s electrical system, it’s essential to prioritize safety. The following guidelines should be strictly followed to minimize risks.
- Always disconnect the negative (-) battery terminal first before working on any part of the electrical system. This prevents accidental shorts and reduces the risk of electric shock.
- Wear appropriate safety glasses to protect your eyes from potential sparks or battery acid splashes.
- Use insulated tools to avoid accidental contact with live wires. Never use metal tools unless you are absolutely certain the system is fully disconnected.
- Work in a well-ventilated area. Battery gases are explosive and can be harmful if inhaled.
- Have a fire extinguisher readily available, especially when working near the battery. A Class B or ABC extinguisher is recommended.
- If you are unsure about any aspect of the process, consult a qualified electrician or RV technician.
- Never work on the electrical system while the engine is running or the trailer is connected to shore power.
- Always double-check your connections before turning the power back on. Ensure all wires are securely fastened and correctly connected to prevent shorts and overheating.
Potential Hazards of Incorrect Battery Switch Operation and Maintenance
Neglecting proper safety procedures and maintenance can lead to several serious consequences. Understanding these potential hazards is vital for safe operation.
- Electric Shock: Improper handling of the battery and its connections can result in a dangerous electric shock, potentially causing serious injury or even death.
- Burns: Overheating components due to loose connections or a faulty switch can generate significant heat, leading to burns.
- Battery Explosions: Batteries produce flammable gases. Sparks or flames near the battery can ignite these gases, resulting in an explosion.
- System Failure: A faulty or poorly maintained battery switch can cause complete electrical system failure, leaving you without power for lights, appliances, or other essential systems.
- Fire: Short circuits caused by loose connections or corrosion can generate enough heat to ignite nearby materials, potentially causing a fire.
Battery Switch Safety Checklist
Regular inspection and maintenance are crucial for ensuring the safe and reliable operation of your battery switch. This checklist should be followed at least annually, or more frequently if you notice any issues.
- Visually inspect the battery switch for any signs of corrosion, damage, or loose connections.
- Check the tightness of all terminal connections. Tighten any loose connections using the appropriate wrench.
- Clean any corrosion from the terminals and switch using a wire brush and baking soda solution. Rinse thoroughly with water.
- Test the switch operation to ensure it correctly connects and disconnects the battery power.
- Inspect the wiring for any signs of damage or fraying. Replace any damaged wiring.
- Inspect the surrounding area for any signs of damage or corrosion. Address any issues promptly.
Mastering your travel trailer’s battery switch isn’t just about avoiding dead batteries; it’s about ensuring a safe and enjoyable RV experience. By understanding the various types of switches, proper installation techniques, and regular maintenance procedures, you’ll be prepared to handle any electrical challenges that arise. Remember to prioritize safety and consult a professional if you’re unsure about any aspect of the process.
Happy travels!
Answers to Common Questions
What size battery switch do I need?
The appropriate amperage rating depends on your battery bank and appliances. Consult your RV’s electrical system specifications or a qualified electrician.
Can I use a marine battery switch in my travel trailer?
While similar, marine switches may not meet all RV safety standards. It’s best to use a switch specifically designed for RVs.
How often should I clean my battery switch?
Inspect and clean your battery switch at least twice a year, or more frequently in humid climates, to prevent corrosion.
My battery switch is making clicking noises. What’s wrong?
This often indicates a loose connection or a problem with the switch itself. Inspect for corrosion and loose wires; if the problem persists, replace the switch.
